Welcome

Sunday, December 11, 2022

Heidesand


The Passion meets Creativity Christmas bakery is officially open. And I’ll hit off the season with a
recipe that I’ve been wanting to posts for years. However, November and December always being
very busy at work, I hardly managed to post more than two recipes on the blog and one in a local
magazine. I wouldn’t say that this year I had particularly more lead time than last year. I closed the biggest projects, but then I got knocked out by some colds twice in 5 weeks.  But here I am, standing again, ready to bake my way through classics. 

I may love Christmas for many reasons, but the holiday treats are one of the top three. Heidesand is
a classic, and a very easy recipe to make. You don’t need many spices or ingredients. Just juggling with the basics. The interplay of vanilla and lemon zest however, makes that many people on this side of the
world claim it as one of their favourites.

So here we are, a few Christmas carols in the background and loads of flour and butter on the
kitchen counter, ready to pursue our common mission to spoil our loved ones with our delicious holiday
baking. This Heidesand recipe is the first of this year’s Christmas collection. Make sure to drop by for more and
if you like it, feel free to share it with fellow bakers.


For around 25 cookies you'll need
200g butter
75g icing sugar
60g marzipan
zest of 1/2 lemon
270g flour
1 egg yolk
1 cup of sugar

***

In a large bowl mix the soft butter with icing sugar, the marzipan, the vanilla sugar and the lemon zest. Then knead in the flour. Form equal-sized rolls of the dough (approx 5 cm) then wrap them in cling film and leave to rest in the fridge overnight. 

Preheat the oven to 180°. 

First whisk the egg yolk with a fork in a small bowl, then brush the dough sticks with it and then roll in sugar. It is best to spread the sugar evenly on a large plate beforehand. Carefully cut 1/2 cm thick slices then place them on a baking tray lined with baking paper. Bake for 10-15 minutes until golden. Leave to cool completely before eating them. They keep up to three weeks in a tin can. 

Enjoy!!!

Are you planning on making this recipe? Or have you already tried it?
Then show me your creations on Instagram: @passionmeetscreativity  I'm looking forward to your comments & suggestions :)

Monday, October 17, 2022

Pumpkin Risotto


Autumn has always been one of my favorite seasons. It's still nice outside, but not too warm. There is still a great variety of delicious produce out there and the days are not yet short either. In recent years, the beginning of autumn has also been the closure of my big projects, the moment I evade for a few weeks to take a decent break. Last year I went to Italy, travelling from lake Como to Florence and back to Milano. This year, it took me to the US, visiting two of my friends in Boston and New York City. 

When I came back last Saturday, I felt like I am ready to get back into my kitchen, and cook up all these beautiful recipes I've worked on over the last two years. But before doing so, I decided to share with you a recipe I once cooked for a very creative dinner party. It must have been in autumn 2018, when 4 of my friends and I decided to have a PUMPKIN dinner. So every dish had to include pumpkin. From cocktails, to amuse-bouche, an entrée my pumpkin risotto as a main, and a pumpkin cake as dessert, we put a fabulous pumpkin menu in place. 

Over the years, when I had guests, I've always made this risotto. With experience, I changed it here and there, to finally come up with the final version, which I only cooked last Saturday. Approved by many, I decided that this pumpkin risotto recipe should not evolve endlessly, but should finally appear on this site. 

So here we are. Pumpkin lovers, risotto lovers and food lovers united, put on that apron and make this delicious recipe. 


For 4 portions you'll need:
400g Arborio rice
225g leek
4 garlic cloves
340g pumpkin purée
1000ml vegetable broth
500ml apple cider
250ml dry white wine
2 tbsp maple syrop
4 thick slices bacon
salt
pepper
100g parmesan

****

Bring 1000ml water to a boil and add vegetable stock. Lower heat, then add the cider and let simmer over low heat. To have all the ingredients ready, chop the leek and garlic and grate the parmesan. 

In a large pot, sauté the bacon over medium heat until crispy.  This might take 8-10 minutes. Remove the bacon slices and set aside. Once cooled down, and between stirring the risotto, chop the bacon. 
Add the leeks and sauté until caramelised, then add the garlic and fry until soft. 
Now add the rice, stir, then deglaze with the white wine. Once rice has absorbed all the wine, gradually add the cider-vegetable stock to the rice, one ladle at a time. Repeat until the rice is al-dente, stirring well after each addition. You might not use all the vegetable stock mixture. 

When the risotto is almost ready, mix in the pumpkin purée and the maple syrup. Stir again, then season well with salt and pepper. Because of the maple syrup and pumpkin puree, you may throw in half a teaspoon each and stir again. 

Once the risotto is done, fold in the parmesan, then plate the dishes. Sprinkle the bacon over the risotto and it's ready to serve. According to your taste, you may top the risotto with more parmesan. 

Enjoy!!!

Are you planning on making this recipe? Or have you already tried it?
Then show me your creations on Instagram: @passionmeetscreativity  I'm looking forward to your comments & suggestions :)

Wednesday, October 12, 2022

Brownie Cookies


I definitely have a sweet tooth, I can't deny this fact. The chances are quite high that when you meet me, you'll find me either looking for a delicious treat or enjoying one. From exquisite French pastry to ordinary candy, there is no category in which I don't have a coup de coeur. 

However, there is one treat, that I definitely fancy A LOT: the good old cookie. And how lucky we are, they come in all shapes and forms. So what makes a good cookie, you ask? Well, for me it is the texture & the flavour what distinguishes a good cookie from an excellent one. 

Last year, one of my colleagues who also loves baking brought brownie cookies to the office. As a brownie fan, I really loved the fact that these cookies were slightly crisp on the outside and super fudgy and gooey on the inside. From the moment I've had one, I obviously wanted more. I thought to myself that I definitely had to try to make these as well. By the time I decided to make them, I couldn't find the recipe my friend told me about. I had forgotten about the name of the website and started doing my own research. I've found so many recipes, many of which seemed way too sweet, or even greasy. Then I had a look at my own brownie recipe and compared it with the ingredients of the many recipes you might find on the World Wide Web. After fiddling around one Sunday afternoon, I came up with this recipe and I can say I am VERY happy about the result.

So hands on your bowls, we're making brownie cookies now! I promise it's a match made in heaven. 


For around 20 cookies you need:
200g dark chocolate
2 medium eggs
80g brown sugar
85g white sugar
30g butter
50g flour
1g baking powder
4g vanilla extract
100g milk chocolate 

****
Preheat the oven to 175°

In a saucepan, melt the chocolate and butter, then set aside to cool for a bit. In a large bowl beat the eggs and sugar until the mixture is very light, then add the chocolate and butter mixture, stirring constantly. In a separate bowl, mix the flour, vanilla extract and baking powder and stir into the egg-chocolate mixture. Fold in 100g chopped chocolate. Place the dough about the size of a tablespoon on a baking tray lined with baking paper, leaving some space between each cookie. Bake at top and bottom heat for 8-10 minutes. Leave to cool completely before enjoying the cookies.

Enjoy!!!

Are you planning on making this recipe? Or have you already tried it?
Then show me your creations on Instagram: @passionmeetscreativity  I'm looking forward to your comments & suggestions :)

Saturday, January 15, 2022

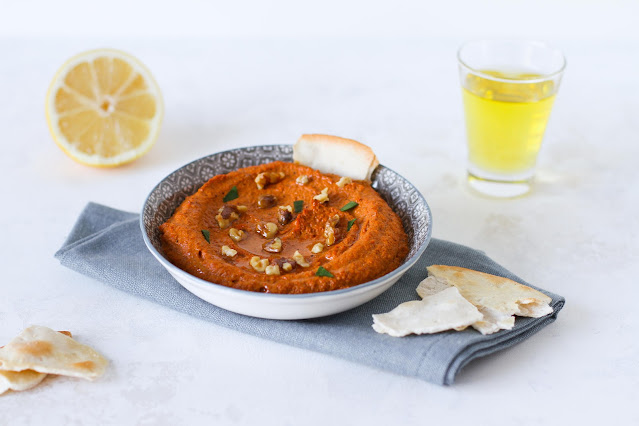
Roasted Red Pepper Walnut Dip

Growing up in Luxembourg, where you have access to real good bread and international foods my love for dips and spreads has grown enormously over the years. I love them with freshly chopped veg, crunchy pizza bread or spread on toast.  Or shall I say especially on toast. The doughy flavours form the bread combined with the charged flavour of a good dip are just a perfect combination. 

It all started when I discovered hummus in Lebanon. I remember my friendly telling his mom that I haven't eaten anything but hummus 'the whole day'. Ive already mentioned this in my hummus post, I know, but this anecdote is just so on point. I love discovering new foods. I've definitely eaten my way through Lebanese cuisine, but when it comes down to it hummus is all I need and actually want. It's so pure.

I think we can all agree that I cannot eat hummus all day every day. That is correct, and if you've been following me for a while, and see the bits and bobs I post on Instagram, you know well that my meals are very diverse and mostly well-balanced. Every now and then, when I don't have plans or duties on Saturday mornings I'll just brunch at home with fresh fruit, granola and various dips and bread. It's a rollercoaster of flavours and textures yet they all have something in common:  they're delicious. But what makes a genuinely good dip? They're always creamy even when sometimes slightly chunky. But in a good way. They contain at least one grain, vegetables a little bit of acidity and good quality olive oil. As Thomas Hümbs from Das grosse Backen would say: es hat die Säure, es hat den Crunch. (literally: it contains the acidity and the crunch it needs) 

For one portion you'll need: 
3 red bell pepper
3 tbsp olive oil + 1 tsp 
130g walnuts
2 small garlic cloves
juice from one lemon
1 tsp ground cumin
1/2 tsp smoked paprika
1/3 tsp cayenne pepper
salt to taste


Preheat the oven to 200° 

Cut the bell peppers in half, remove stems, seeds and membranes. Place the peppers on a parchment paper lined baking tray with the cut side down. Rub with 1 tsp of olive oil, then roast for 40 minutes until the skins are very dark and blistered. 

Now transfer the peppers to a bowl and cover it with plastic wrap. Wait ten minutes, remove the wrap and let cool a few more minutes before removing the skin. 

Reduce the heat to 160°. Spread the walnuts on another parchment paper lined baking tray and toast for 7 minutes max, as the nuts should not burn. Set aside to cool.

In a food processor blitz the garlic until finely chopped. Add peppers, walnuts, olive oil, spices and lemon juice and blitz until your preferred consistency. Season with salt to taste. Garnish with a few walnut chunks and parsley.

Enjoy!!!


Sunday, January 2, 2022

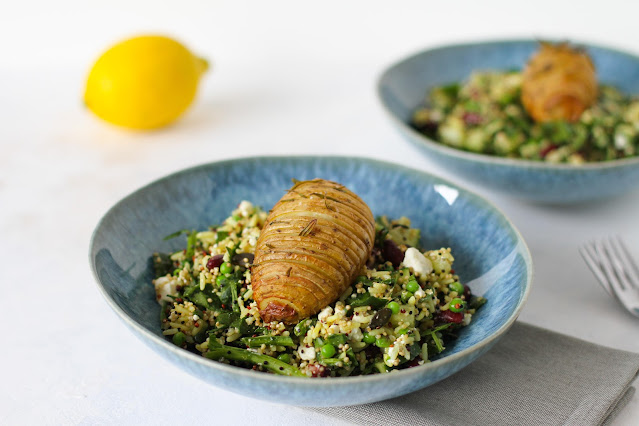
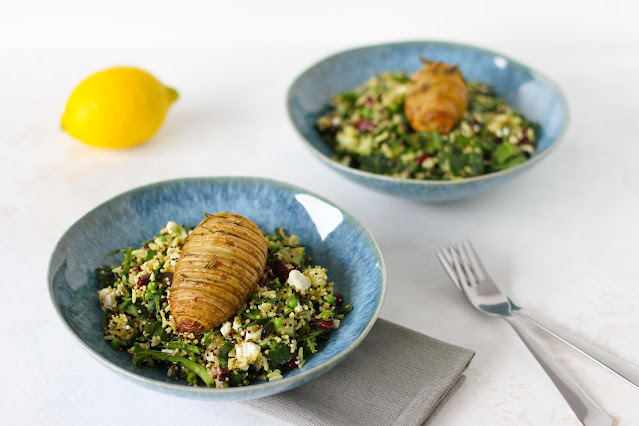
Hasselback Winter Salad


Winter is here and after all the festive indulgence my body was definitely asking for nutritious food again. You probably know that feeling when you're looking at your pantry and every cell of your body screams: enough! I admit, after all the baking it was time that I come up with some savoury and most and for all healthy dishes again. Even though most of you enjoyed the festive baking and seasonal desserts quite a lot, at some point it's also time to adjust the lever. 

The best thing about winter salads is that they're often a combination of fresh and crunchy vegetables and lukewarm grains and carbs. During the cold season it's often difficult to add some color (except the obvious green) to healthy dishes but here we are. Add on: beans are a great source of protein as well. Rounding the whole thing up with my favourite herb adds a little extra flavour to it.


For two bowls you'll need:
2 large potatoes
1 tbsp olive oil
2 rosemary sprigs
65g quinoa
65g rice
1/2 tsp curcuma
2 handful chopped spinach
1/2 cucumber
120g red beans
65g peas
100g feta
2 tbsp pumpkin seeds
1 tsp buddha bowl spice (or a mixture of ground ginger, cumin, coriander, pepper, cayenne pepper)
sea salt


For the dressing:
4 tbsp olive oil
juice of one lemon
1tbsp apple cider vinegar 

*****

Preheat the oven to 180°

Place the potatoes on a chopping board and slice through the potato. Be careful not to cut all the way through. Put the potatoes on a baking tray and drizzle with olive oil. Add the rosemary in between the slices, then season with sea salt. Bake for around 45-50 minutes.

Now cook the quinoa and rice in two different pots. 

Rinse the cucumber and cut into small cubes. Rinse the spinach, then finely chop. Put both greens into a large bowl. add the beens, crumbled feta and peas. Mix then add the quinoa. In a separate bowl add the curcuma to the rice, mix well, then add to the salad. 

For the dressing, first chop the rosemary. In a small bowl whip together all the liquids then add the chopped rosemary. Pour over the salad and mix until it's well coated. 

Dress each bowl with a few tablespoons of salad, then place the hasselback potatoes on top.

Enjoy!!! 

Are you planning on making this recipe? Or have you already tried it?
Then show me your creations on Instagram: @passionmeetscreativity  I'm looking forward to your comments & suggestions :)

 photo s_04.jpg  photo s_05.jpg  photo s_06.jpg