Welcome

Sunday, December 24, 2023

Eggnog Cinnamon Rolls


If you live/ have lived in Luxembourg you know the eggnog drink that appears every year by the end of October / beginning of November in the local supermarkets. I have to admit, when the days get shorter, the temperature drops and the only thing you want to do is snuggle up in your home and enjoy comforting hot or cold drinks Luxlait's Egg Nog has always been one of my favorite. 

Even as a kid I couldn't await the moment when eggnog finally did its reappearance in the shelves, and so I think I can say this is the seasonal product that I've consumed most in my entire life. I cannot recall the number of packs I've drank over the years, but its been loads. Even when I had covid and didn't taste a damn thing, I still kept up the tradition. Obviously it didn't kick as good during these days, but there's something about the texture that also makes it a comforting drink. 

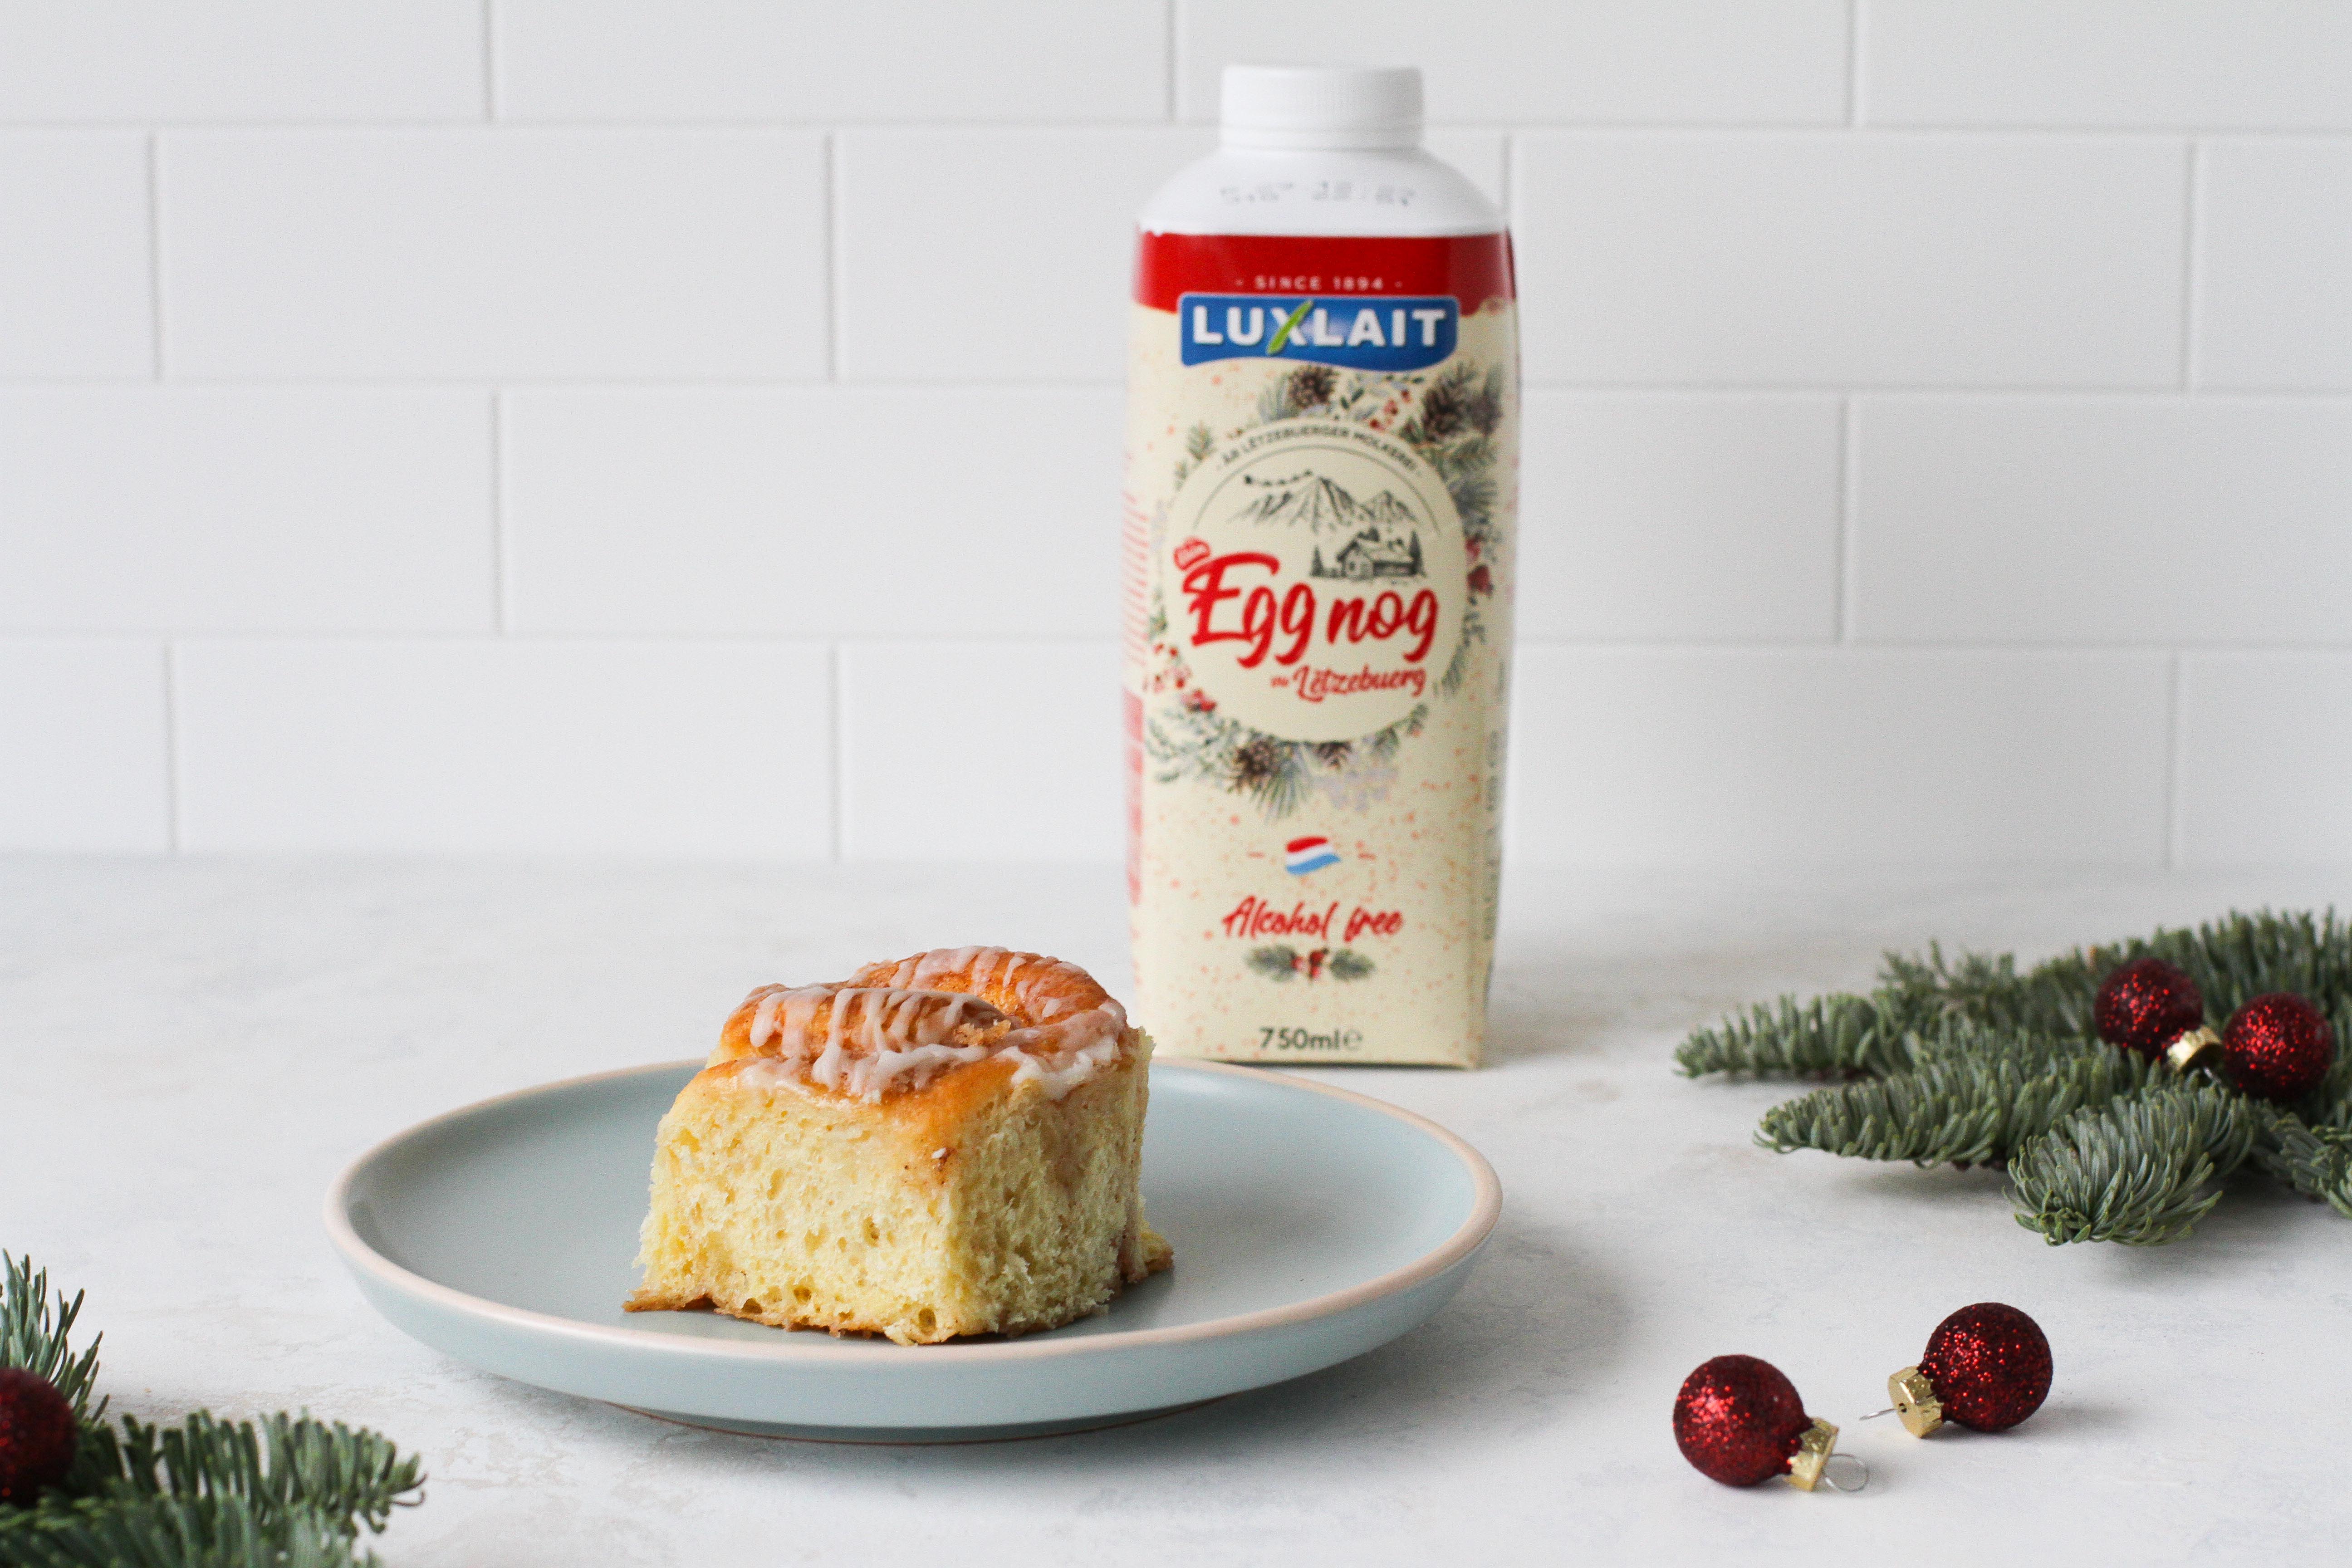
Fast forward to 2021, when I developed another culinary obsession: CINNAMON ROLLS. I've always loved a good cinnamon bun, but I had one in particular that made my taste buds go wild. The ratio of the icing, dough and cinnamon sugar mix was perfect, so I took one home for the next day as well. It was around Christmas time as well, so I had the bun with my beloved eggnog (Yeah I know, in terms of sugar every GP would start yelling at me) and I thought to myself. This is it!! There has to be a Christmas edition for the classic cinnamon roll. What about putting that delicious Luxlait egg nog into the dough and the icing and look what's going to happen. I tell you what happened: the perfect seasonal cinnamon roll was born. 

So I teamed up with Luxlait, the Luxembourgish dairy company which makes my favorite egg nog drink, and told them that I've created the perfect Christmas breakfast item. When to enjoy a good egg nog cinnamon bun? Well, during the jolly season, on Christmas morning and after Christmas with all your leftover egg nog (I know you too stocked up a bit as it's going to disappear real soon!)

For 12 buns you'll need:

Dough
500g flour
2 tsp brown sugar
7g dry yeast
1 pinch salt
150 ml Luxlait egg nog
100g butter
3 eggs

Filling
100g butter
150g brown sugar
100g white sugar
3 tsp cinnamon

Glaze
250 powdered sugar
5 tbsp Luxlait egg nog


Mix 400g flour, brown sugar, salt and yeast in a bowl. Add the eggnog and butter and knead. Now gradually fold in the eggs and the remaining flour. Cover the dough with cling film and leave to rest for an hour. Make sure you don't use a steal bowl, because the dough won't rise that good in there. 

While the dough is resting, melt the butter for the filling. Mix with both types of sugar and cinnamon. Then line a baking tray with baking paper. 

Preheat the oven to 180°.

Once the dough is ready, knead it again and roll out into a rectangle (20x40 cm). Spread the butter mixture on top and then roll up the dough from the long side. Cut the dough into 12 rolls (I used a thread), then place them on the baking tray and cover with cling film again. Let rest for another 30 minutes, then bake for around 30 minutes. 

In the meantime, prepare the glaze by mixing the eggnog and the icing sugar. Pour the glaze over the warm cinnamon rolls. 

Enjoy!!!!

Are you planning on making this recipe? Or have you already tried it?
Then show me your creations on Instagram: @passionmeetscreativity  I'm looking forward to your comments & suggestions :)

Saturday, December 23, 2023

Marillenringe


Marillenringe are a classic. I remember a day back in the nineties, when we stayed in the black forest region with my family over Christmas. We were having our afternoon tea, enjoying some Christmas cookies that I would occasionally dip into my milk. Yes, it’s that long ago! The buttery scent, the crunch of the shortbread cookies and the sweet flavour from the apricot jam, made these little treats real treasures. With every bite, you would dig deeper into this pure bliss, stimulating all your senses. No surprise that everybody had a big smile on their face afterwards. 

Looking back, I think that it was one of the whitest, coldest but also most festive Christmases we’ve ever had together. Nobody was in charge for anything but enjoying our Christmas holidays. Nobody had to buzz around like a busy bee because everything was taken charge of: Dad didn’t have to prepare the Christmas Eve dinner, mom didn’t have to ensure everyone was invited and all the other things were ordered. My grandma didn’t have to stay in the kitchen for hours to prepare lunch on Christmas Day. We could just enjoy everyone’s presence and indulge. 
I actually also do love Christmas at home though. I love helping my family with all things food. That’s why this year I’m in charge with everything nibbles. I already have everything sorted out for the appetisers, and I’m also planning do make few more Marillenringe this week to enjoy with our coffees. Very often, it’s the moment where everyone (especially the hosts) can relax and the real fun of the get togethers begins. 
Best thing: They are really easy to make and keep a long time in a metal box (note to self for next year).


For around 30 cookies you'll need:
400g flour
125g sugar
1 egg yolk
15ml rum
225g apricot jam
250g butter
8g vanilla sugar
1 pinch salt

****

Pour the flour onto the work surface. Make a well in the middle, then add the sugar, salt, vanilla sugar, egg yolk and rum. Spread the butter in flakes over the flour. Knead all the ingredients into a shortcrust pastry. Wrap the dough in cling film and leave to rest in the fridge for 2 hours. 

Preheat the oven to 180°.

Remove the dough from the refrigerator and let sit several minutes. Remove the cling film, then dust your work surface with flour.  Now roll the dough to a 3-4 mm thickness. Cut out round cookies and rings, then place them to a parchment paper lined baking tray. Bake for 10-15minutes. Here again, watch the cookies, as all ovens work differently. Cookies should be golden and not too dark. Repeat the same process until you've used all your dough. 

To finalise the cookie sandwich, dust ring cookies with icing sugar.

Stir the jam over a medium heat until smooth, spread it on the cookies and place the rings on top. Add some more jam in the middle of the rings. Leave to dry well before storing the cookies in a tin. 

Enjoy!!!

Sunday, December 10, 2023

Festive Baked Apple Trifle


When it comes to Christmas desserts, opinions differ A LOT! Some people prefer a good old bûche de Noël, while others long for lighter and more creative creations. If you're one of the latter, I may interest you in a very delicious, seasonal and festive baked apple trifle.

In 2020 I published my Vanillekipferl recipe, and you might remember that restrictions were relatively high back then. You weren't allowed to meet up with many people, and so I happened to have all these Christmas cookies, and no one to enjoy them with (apart from a very few people). 

But situations like these are usually the source of newfound creativity. Had I been able to see more people, I definitely would have given the cookies away, or shared them with friends over coffee. So here I was, in my kitchen, looking for ways to incorporate these vanilla treasures into one of my Christmas desserts, and I have to say, I am very happy with the result. What I love most about this Christmas dessert is that it has its seasonal fruits and the festive note with the white wine cream rounding it up with a classic Christmas cookie. 

For 4 glasses you'll need

1 ½ apple
15g butter
160 ml Chardonnay
140 ml apple juice
20g vanilla sugar
1 tsp cornstarch
110g low-fat quark
100g crème fraîche
1 tsp lemon juice
1 tsp sugar
140g crushed Vanillekipferl + 4 for decoration 

******

Stir the apple juice and Chardonnay in a bowl. Sweeten with 10g vanilla sugar and whisk in the cornstarch. 

Remove the core from the apples, peel and then cut into small cubes. Melt the butter in a small pan, then add the apples and sauté briefly. Add the apple juice mixture, quickly bring to the boil and then leave to cool.

Stir the quark with the sugar and the remaining vanilla sugar, then add the crème fraîche and mix until you have a smooth cream. Season to taste with the lemon juice and stir again briefly. 

Put 4 Vanillekipferl to one side, crumble the rest into medium-sized pieces. Pour the cookie crumbs into the glass first, then add the quark cream and finally top with the apple compote. Decorate each with a Kipferl. 

Enjoy!!!

Are you planning on making this recipe? Or have you already tried it?
Then show me your creations on Instagram: @passionmeetscreativity  I'm looking forward to your comments & suggestions :)


Saturday, December 2, 2023

Zimsterne


December is always a very busy month, yet also a very delicious one. What I love most about December is that you may be in a rush for many reasons (work, family, friends, volunteering, etc) but there's always room for a sweet moment with Christmas treats. Sure breaks are nice in any given season, but is there anything more comforting than having a break around Christmas time? Seriously, just think about it. Taking a break with a cinnamon star or two in one hand, and a seasonal tea or coffee in the other - daydreaming about the upcoming weeks, about winter, and the snow. 

Well, at least that's how I slide through the advent season. So today's recipe is a German classic: Zimtsterne. Zimtsterne are cinnamon stars with a meringue like icing on top. I have so many lovely memories of Zimsterne moments. When we were little, and my grandparents were still alive, we used to go to the south of Germany or Austria later on during the festive season. So in my childhood we often had white Christmas, with loads of Christmas cookies. But somehow the Zimtsterne were always among my favourite. 

Those of you who follow along for a while, know that my grandpa started baking a lot after retiring. So when I grew older, we baked many Christmas Cookies together. Of course we also made Spitzbuben, Heidesand and Vanillekipferl here and there, but my favourite always were the Zimtsterne. So let me take you on a delicious journey, with cookies crisp on the outside and super soft on the inside, where the flavours of cinnamon and hearty almonds melt together. 


For around 40 cookies you'll need:
250g icing sugar
3 egg whites
1 tsp vanilla extract
2 tsp cinnamon
400g unpeeled ground almonds

****

Preheat the oven to 120° (fan)

In a large bowl, beat the eggs until stiff, then gradually whisk in the icing sugar. Remove two large table spoons of the beaten eggs and set aside for the coating later on. 

Now fold in the vanilla extract, cinnamon and around half the almonds. Add the rest of the almonds, then use your hands to bring together an even dough that is barely sticky. 

Wrap the dough in cling film and leave to rest in the fridge for one hour. 

Put the dough on a surface generously dusted with icing sugar, then roll the dough out to 1/2 cm sickness.

Cut out the stars with a cookie cutters, then place them on a baking tray lined with baking paper, then spread some of the icing you set aside on the cookies. I used a silicon pencil but you can also use a knife or a spoon. Bake for approximately 25 minutes. 

Once the cookies are baked, put them onto a wire rack and let cool. 

Re-roll the excess dough and repeat the process until there's no dough left. 

The cookies remain moist, crispy yet soft if stored in cookie tins with lids for around two weeks. 

Are you planning on testing the recipe? Or have you already tried it?
Then show me your creations on Instagram: @passionmeetscreativity  I'm looking forward to your comments & suggestions :)


Sunday, July 30, 2023

Chocolate Chip Walnut Cookies


Yet another cookie recipe you might think. But let me invite you to stay a little bit longer on this page and read the story behind this recipe. 

Last fall, I went to see a friend in New York, and the second night of my stay we went to a bbq night at one of her friends'. The French-Puerto Rican couple, who were such great hosts, served great grilled steak and beautiful salads and cheese. You already feel the French summer night vibe here, right? 

Once we finished our meal, the hosts served Levain cookies for dessert. If you ever had cookies from the Levain Bakery, you know how awesome this was. They're undoubtedly the best cookies in the world. It's the perfect ratio of crispness on the outside, and gooeyness on the inside. 

I stayed several days in the city, then continued my trip to the Hamptons, and later on to Boston/ Cambridge to visit another friend. A fews days there, I introduced her to the Levain cookies. We both agreed: best cookies in the world. I was so happy to share this experience with her, as we all know that shared happiness is doubled happiness. This is especially true when it comes to food!

Back home I couldn't stop talking about the fact that I've finally found the best cookie in the world and found a few more fans among friends and colleagues. Some of them walking 15 blocks under pouring rain to bring a decent amount back home, just to enjoy them a little longer than a 5 day trip in NYC.

So what does all this have to do with my recipe, you may ask? Well... actually it's the root of it all. Since last September I've researched so much, compared numerous recipes and asked skilled fellow bakers what they think about my findings in order to create my own delicious recipe of chocolate chip walnut cookies. 

I always aim to recreate my culinary experiences, when it comes to travel recipes. I start with good research, and talk to people from the countries I visited before I start my testing process. For this recipe I stayed longer in the theoretical process than usual, but I am glad I did. It only took me one test run to get to the final recipe. And I am soooo happy with the result. 


For 15 cookies you'll need:
300g good quality dark chocolate chips
225g butter
240g walnuts
300g fine brown sugar
330g flour
2 large eggs
1,5 tsp fine sea salt

*****

In a large bowl, whisk together the butter and sugar. Gradually add the flour, then add the eggs one by one until the dough is well combined and starts sticking to the sides. Scrape down the sides of the bowl, then fold in the nuts and chocolate chips. Whisk again until you get an even dough.

Flatten the dough, wrap it in cling film, and refrigerate for an hour. Divide the chilled dough into 15 equal portions (+/- 90g) and roll each of them into a ball. Refrigerate the balls for another 2 hours. 

Preheat the oven to 180° fan & line a sheet pan with parchment paper. 

Place 4 dough balls on the prepared sheet pan and bake for 18 minutes. Let cool for 5 minutes, then transfer to a wire rack to let cool a little more. You can either enjoy them still warm or completely cooled down.

Enjoy!!!

Are you planning on making this recipe? Or have you already tried it?
Then show me your creations on Instagram: @passionmeetscreativity  I'm looking forward to your comments & suggestions :)

Thursday, April 6, 2023

Asparagus Quinoa Salad (sponsored)

 
Oftentimes when I am researching delicious flavour combinations of seasonal produce, I am
wondering which wines would be the perfect pairing. Spring is the most challenging season, I find,
because it might still be a bit chilly, yet the vegetables are already spoiling us with their particular
nuances.

For this particular recipe, with the Vinsmoselle Fréijoerswäin (spring wine) I knew I wanted there to
be asparagus and a zesty note from the lemon vinaigrette. This very type of wine is fruity with
aromas of ripe grapes and tangerines. On the palate, it is juicy, fresh with hints of lemon, and vanilla.
I enjoyed doing this taste recall in order to round it all up.


For two portions you’ll need:
180g dry quinoa
1 bunch asparagus
200g peas
50g feta
3 scallions
5 sprigs flat parsley
60g slivered almonds
60ml olive oil
1 lemon (juice & zest)
Salt
Pepper


Start with rinsing the quinoa, then cook it according to the instructions on your package.
While the quinoa is cooking, blanch the peas and asparagus in salted boiling water for just a few
minutes, then place them into ice cold water for them to cool quickly.
Once the quinoa has cooled, combine it with the blanched veggies in a bowl. Slice the scallions, chop
the parlsley and add them to the salad. Now you can also add the almonds and give it a good toss.
Pour over the olive oil & lemon juice, add the lemon zest and stir again. Season with salt and pepper
to your taste and give it a last toss. Crumble the feta and sprinkle it over the salad.
Now the salad is ready to be served.

Enjoy!!!

Are you planning on making this recipe? Or have you already tried it?
Then show me your creations on Instagram: @passionmeetscreativity  I'm looking forward to your comments & suggestions :)


Monday, March 6, 2023

Lemon Almond Cake


If there's one thing we should all love about winter, it is the large variety of citrus fruits. Their prime harvest time is between late November and early March. My favourite citrus fruits to use in the kitchen are lemons and blood oranges. They give me that instant summer feeling, and add  a lovely taste of sunshine to all of your dishes. I like adding them to savoury recipes as much as I like them in desserts.

Today's treat is my super moist and fluffy lemon almond cake. I have to admit, it's been ages since I've last made it so I was a little nervous if I still remembered the instructions my granddad gave me decades ago. When my grandma handed me his old cookbooks, I found a note with this very recipe but the 'little extra' was not written on it. I have a great memory, and I hope it stays this way for a while, because part of my recipes that are not yet on the blog, exist only in my head. All jokes aside, if all goes according to plan, the three remaining recipes will appear on the blog until the end of the year. 

So back to the cake, this lemon almond cake is a perfect cake for your afternoon teas or coffee dates with friends. It is gluten and dairy free, but not vegan. So if you have people with dietary restrictions around you, you may still bake them a super delicious treat. 

For one cake you'll need:

225g sugar
225g ground almonds
zest from one lemon
juice from two lemons
4 eggs
salt

****

Preheat the oven to 180°

Separate the egg whites from the yolks. 

In a bowl whisk together the sugar and egg yolks. Add the almond powder, lemon zest and juice. Beat the egg whites with a pinch of salt in a separate bowl until stiff, then fold them gently into the almond lemon mixture. 

Butter a springform tin, then add the batter. 

Bake for 45 minutes. When a toothpick comes out clean, the cake is ready.

Leave to cool before unmoulding. 

Enjoy!!!

Are you planning on making this recipe? Or have you already tried it?
Then show me your creations on Instagram: @passionmeetscreativity  I'm looking forward to your comments & suggestions :)


Tuesday, January 17, 2023

Vegan Lentil Bolognese


Are you in the mood for delicious yet healthy comfort food? Then you're in the right place!

During these gloomy winter months, we definitely all need delicious flavourful dishes to warm our souls. When I first researched what I could use as substitute in a vegetarian or vegan version of the classic Italian ragù, I didn't expect to love the lentil option so much. But, as  always I was quite determined to end up with the perfect recipe. And after 2 solid trial runs I had the perfect ratio between proteins & veg, acidity & crunch.  

My lentil bolognese is a very recent recipe I developed, but I can sense that it will be one of my go to pasta recipes from now on. It's better than the store bought sauces, it's nutritious... and let's not forget about the best thing:  you may open a bottle of wine to cook it. One glass for you, and one for the sauce. That's a fair split, right?


For 4 people you'll need:
3 large carrots
1 celery stalk 
500g (cooked) lentils
125g dried tomatoes (I used the ones not soaked in oil)
3 garlic cloves
1 large onion
olive oil
150ml red wine
800g diced tomatoes
2 bay leaves
1 tsp Italian seasoning (marjoram, thyme, rosemary,..)
1 tsp oregano 
Salt & pepper
150ml water

500g Pasta

cheese (vg or dairy) or yeast flakes

****

Roughly chop the vegetables and dried tomatoes, then add them to your food processor. If you don't own one, finely chop all the mentioned ingredients. Make sure not to over-process the vegetables in order to avoid them becoming purée. 

Heat some olive oil (make sure to use enough as there is no meat fat) in a large pot and add the shredded vegetables to brown. Let simmer for a solid 15 minutes while stirring regularly in order to prevent them from burning. 

Then add the red wine and let it cook-off completely. Add the tomatoes and lentils and stir. Now add the Italian seasoning, bay leaves and oregano and stir again. Once all the ingredients combined, reduce to low heat, add the water and let the sauce simmer for around 40 minutes. 

Meanwhile, cook the pasta and keep a cup of the pasta water in order to add to the sauce if necessary. 

Take out the bay leaves and serve the lentil bolognese over the pasta. And for the final touch don't hesitate to top it off with parmesan, nutritional yeast or vegan cheese.  

Enjoy!!!

Are you planning on making this recipe? Or have you already tried it?
Then show me your creations on Instagram: @passionmeetscreativity  I'm looking forward to your comments & suggestions :)

 photo s_04.jpg  photo s_05.jpg  photo s_06.jpg